Instructions for creating, editing, and deleting orders, assigning them to customers, and adding samples.
Navigation
To create an order, follow this path:
Navigation bar → Orders → + Order
Depending on the configuration, you have one or more custom-named order templates available for creating new orders.
Click the desired order template to create a new order.
Further information: Create order templates
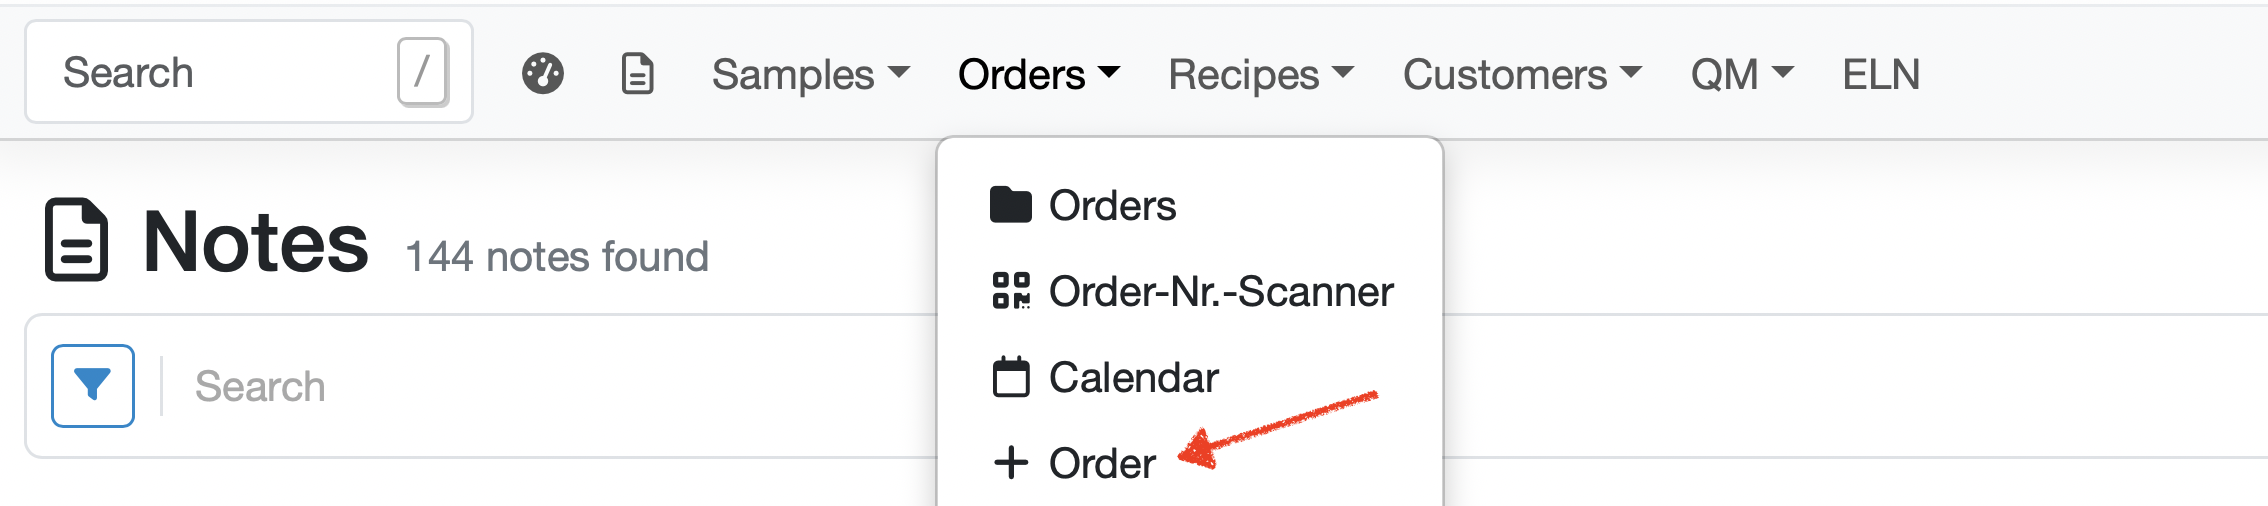
Figure: Adding an order from the navigation bar
Other ways to create an order:
Orders can also be created starting from a customer, an object (industry-specific configuration) or directly from the order management. When creating an order from a customer or a object, the respective customer or facility is already preselected.
Create an order in Order Management:
Click: Navigation Bar → Orders → Orders → + Add Order
Note: The exact labels may vary depending on the configuration of your LDB.
Overview
The order consolidates all information about an engagement and enables:
- Assignment to a customer and, optionally, to tags
- Use of order templates with individually configured attributes
- Adding samples and inspections (site inspections - configuration dependent)
- Managing the processing status via the status (e.g. in progress or archived)
Add Order
Enter basic data
The fields of the Add Order screen are described below:
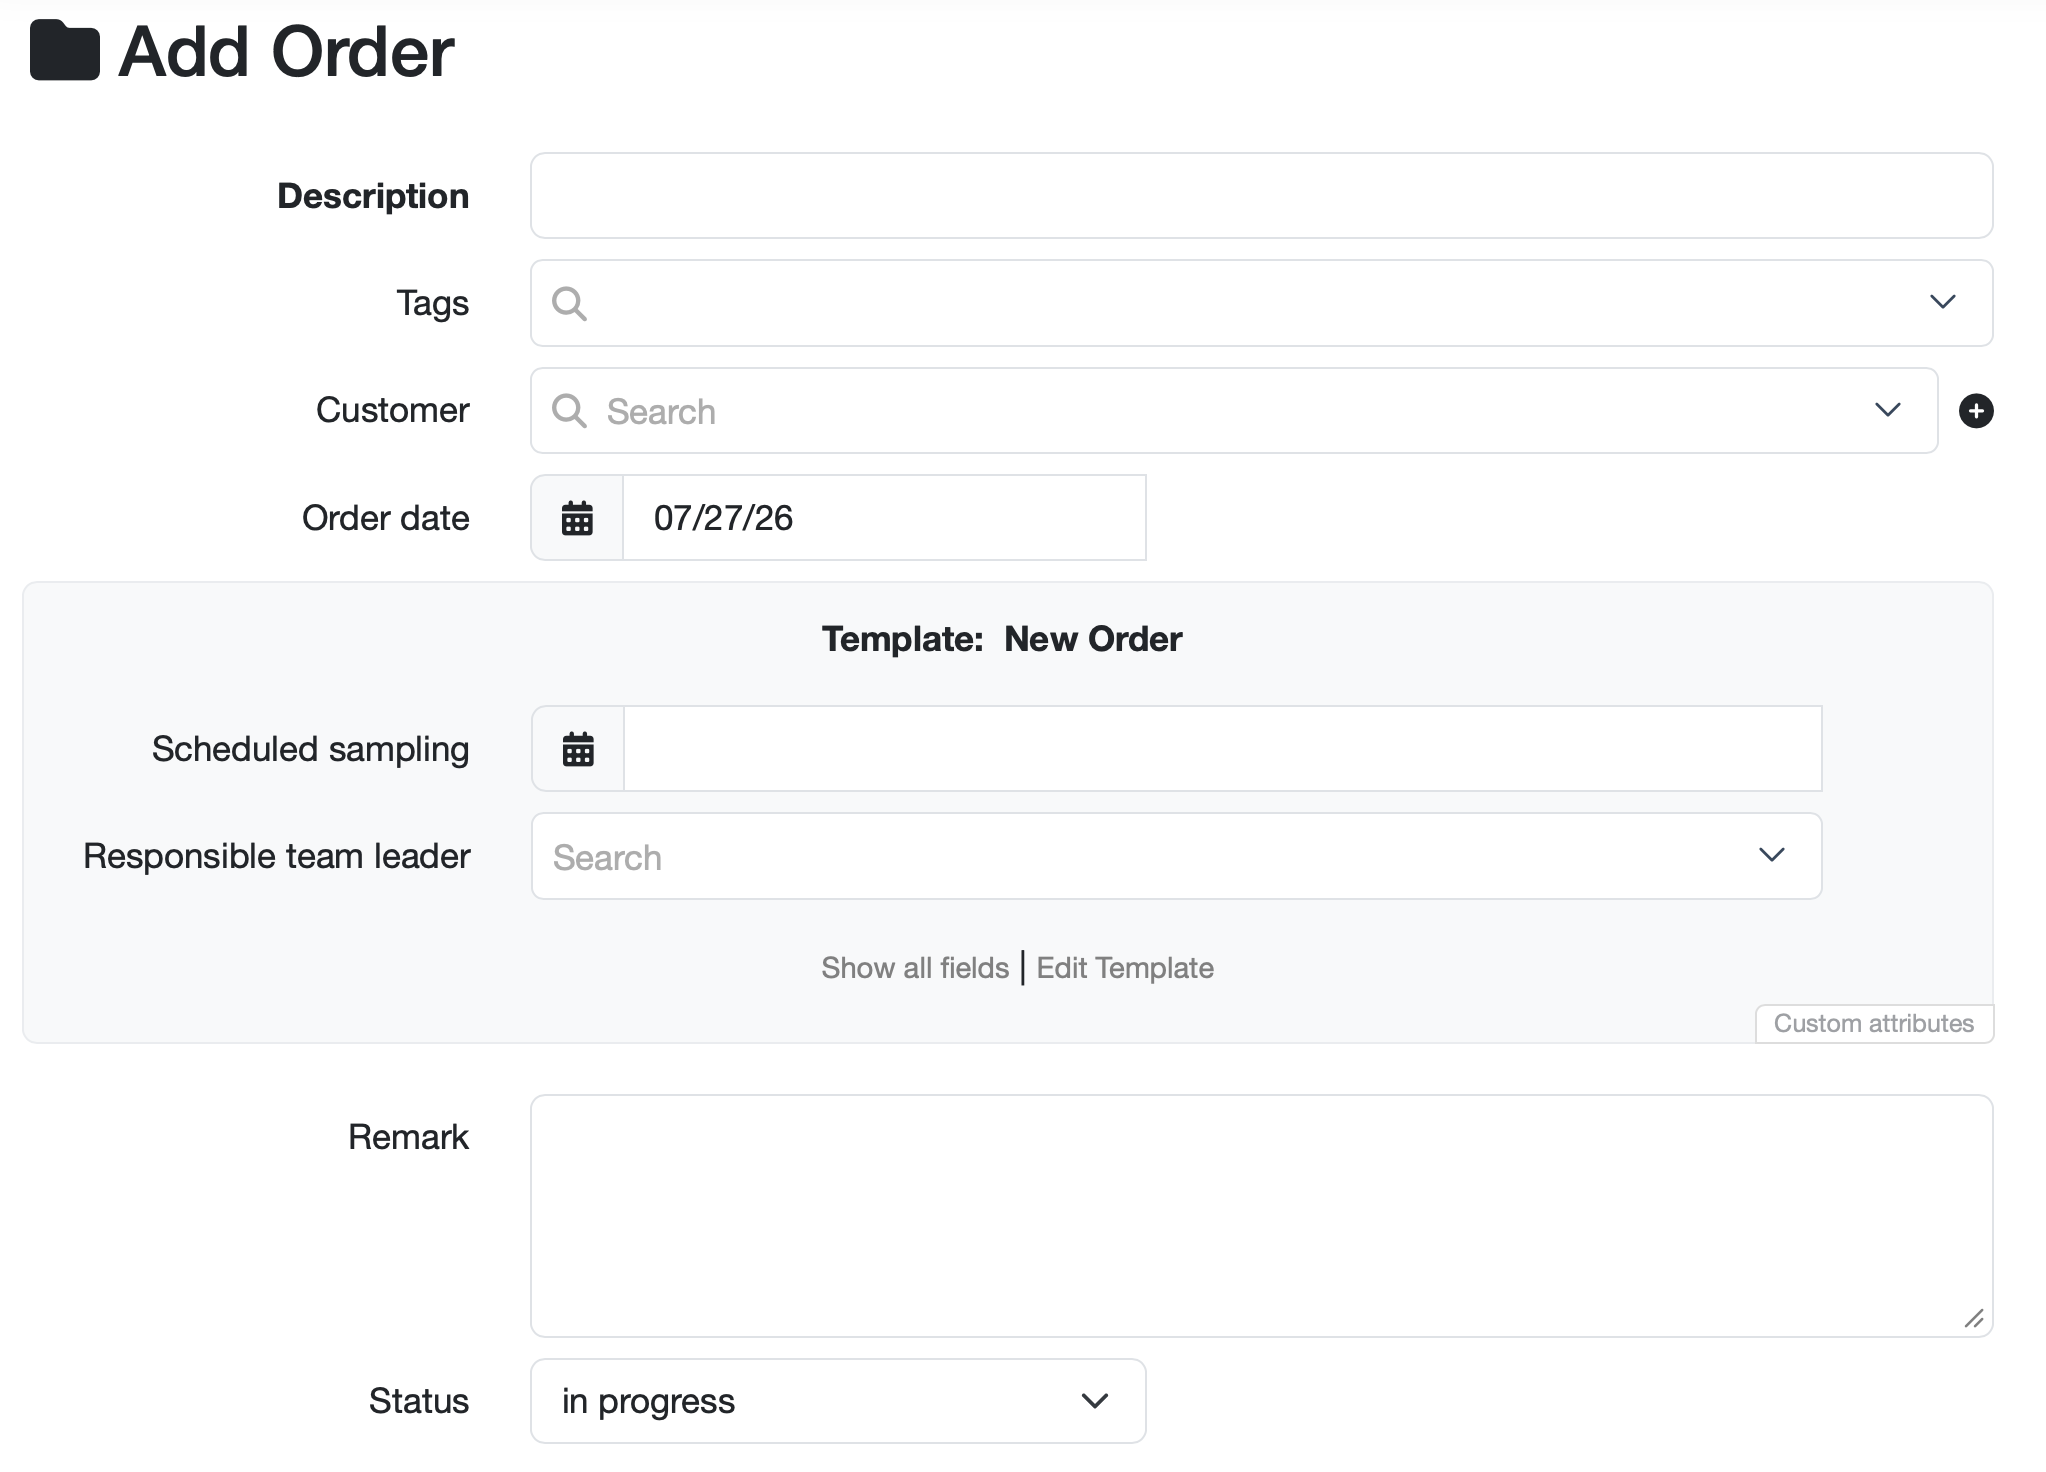
Figure: Add Order screen with individually configured attributes (grey area)
- Description: Give the order a meaningful name. This field is mandatory.
- Tags: Assign one or more tags to find the order more quickly when searching.
- Customer: Select the associated customer in the search field (magnifying glass icon). Alternatively, you can create a new customer directly using the + button.
Further information: Create/edit/delete customer
- Order date: The order date is pre-filled with today's date. If necessary, adjust it using the date picker (calendar icon).
- Remark: Enter additional information about the order here as free text.
- Status: Define the processing status. New orders are set to the default defined in the status management.
Further information: Status management
Order template and customized attributes
- Order template (grey area): The customized attribute fields in the grey-shaded area (e.g. Scheduled sampling and Responsible team leader) come from the selected order template.
- Show all fields: Click Show all fields to also display the fields hidden by the template.
- Edit Template: Via Edit Template you go directly to editing the underlying order template (corresponding access rights required).
Further information: Create order templates
Our recommendation: You can have the configured attribute fields set up according to your requirements by your LDB customer support and then create templates for orders. This way, recurring fields are already selected and, if applicable, pre-filled.
Numbering system for orders
The LDB assigns numbers to newly added orders according to a configurable pattern. This allows the numbering to be adapted to many requirements – from a simple sequential number to a format that includes the date, customer or further details.
Note: The number format is configured centrally by your customer service team as part of the setup process.
What options are available?
An order number can be composed of various building blocks:
- Sequential counter: Each new order number is incremented automatically – either with a fixed number of digits and leading zeros (e.g. 00001) or without zeros.
- Date information: Year, month, day or calendar week can be included in the number, so that the creation period is directly recognisable.
- Fixed letters and characters: Prefixes such as A for order and separators (e.g. -, /, .) ensure a consistent, easily readable format.
- Details from the order: Information such as the assigned customer, the name of the order template used or a configured master data field of the order can be adopted in full or in part to create meaningful order numbers.
- Grouping of the counter: You can define the range in which the counter restarts – for example yearly, monthly or weekly – or, alternatively, have it run continuously over several years.
- Date shift: If your fiscal year differs from the calendar year, the year boundary relevant for the numbering can be shifted by a certain number of months – for example so that the year does not start until 1 August, or so that it already starts on 1 December.
Examples
- Simple sequential number: A00001, A00002, A00003 …
- With year: A26-00001, A26-00002 … (the two-digit year is part of the number)
- Year and calendar week with a weekly restart of the counter: 2026.16-0001, 2026.16-0002 … and in the following week 2026.17-0001
- Continuous numbering over several years: The count does not restart at the turn of the year but continues sequentially.
Note: Details that are only added automatically after an order has been created (e.g. via evaluation triggers) are not yet available at the time the number is assigned and therefore cannot be part of the number.
Add samples
After you have saved the order, you can add samples directly to this order, e.g. via the Samples tab.
Further information: Add/Edit/Delete samples
Inspections or site inspections are configuration dependent and are used when services are provided that do not involve any samples.
Further information: Add on-site inspection
Edit Order
- Open the order's detail view by, for example, clicking the blue-highlighted name or number of the order in the order management, and then clicking the yellow Edit Order button.
- Alternatively: In the order management, click the grey pencil icon to the right of the order's description.
- You can use the search functions, to find the order more quickly, and then click on the blue-highlighted number of the order.
Set access rights per order
When you create a new order, the selected customer’s read permissions are automatically applied. If necessary, you can set order-specific access rights in the edit view of an existing order to restrict the visibility of orders and samples to specific employees. These permissions then also apply to all samples in the order.
In the Who sees this entry? area on the right, select the relevant employees or employee groups that are allowed to see the order.
The following options are available:
- Everyone: The order is visible to all employees.
- Only me: The order is visible only to you.
- Employee groups: The order is visible to the selected employee groups.
- Employees: The order is visible to the selected employees.
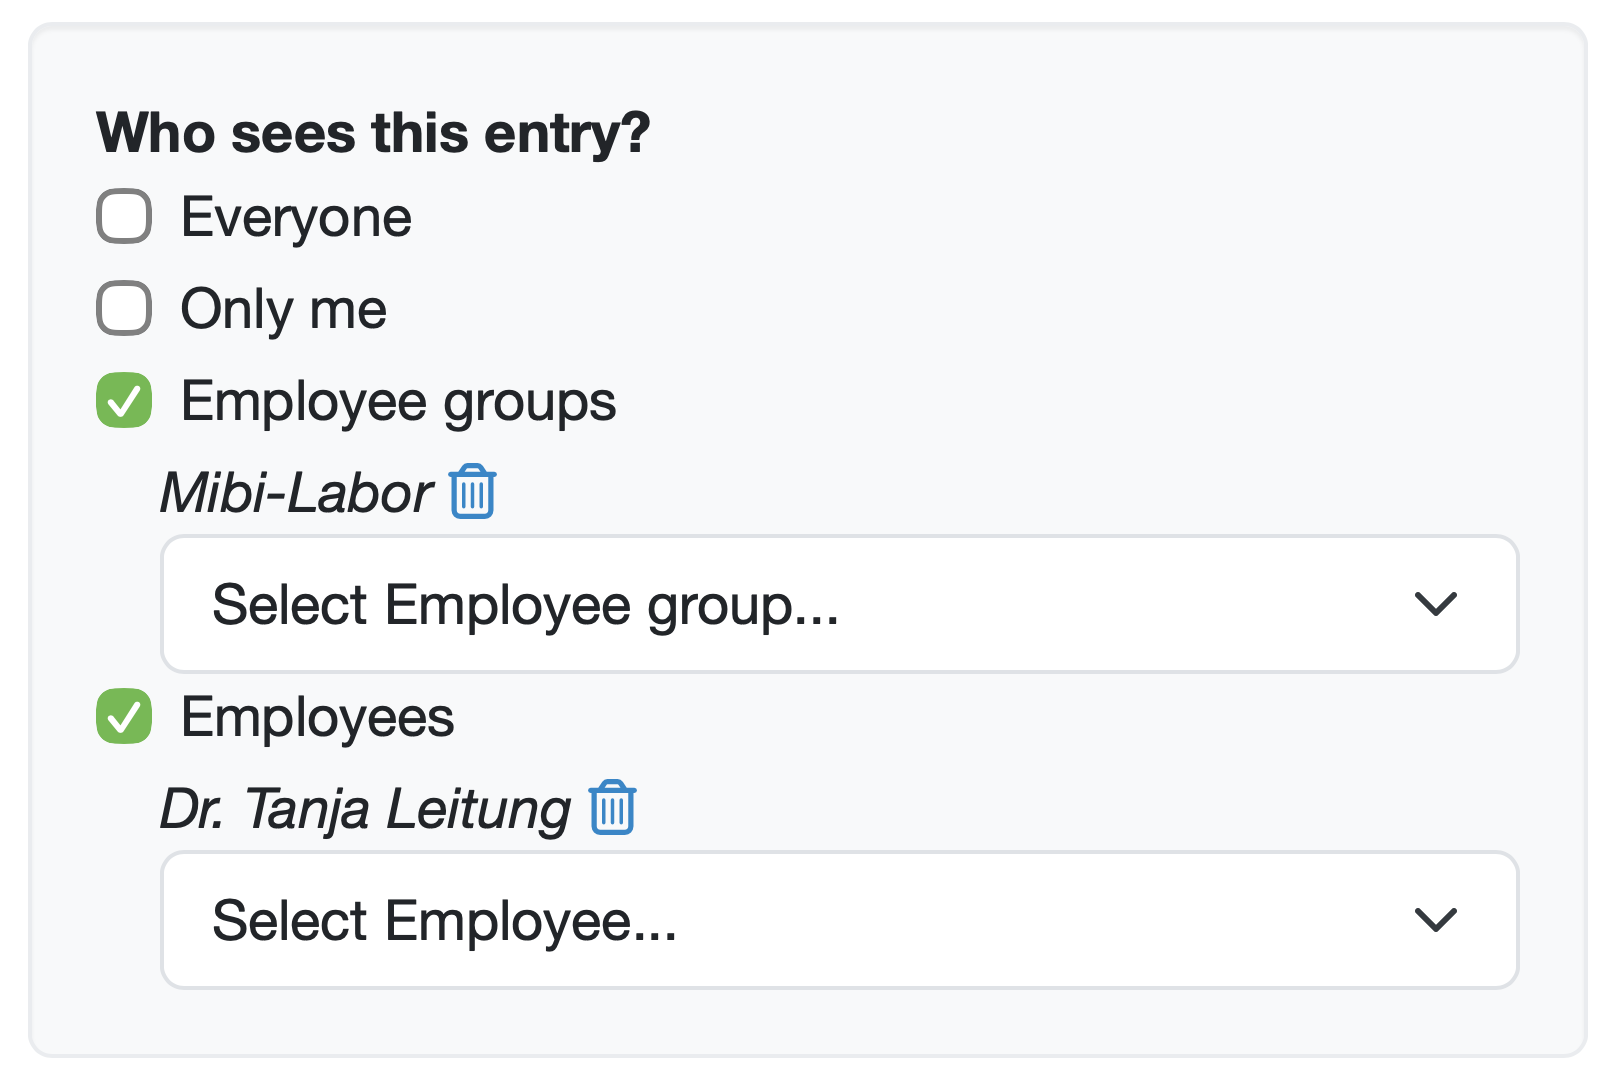
Figure: Who sees this entry?
Further information: Manage employee groups
Archive Order
An order is archived instead of deleted if it already has associated samples or should be retained for traceability reasons.
- Open the order via Edit Order.
- In the Status field, select the archived status. The Save button then changes to Archive Order.
- If samples are assigned to the order, you can use the displayed checkbox to specify that the associated samples are archived as well.

Figure: Status selection with option to archive the associated samples
Delete Order
Only orders that have no associated samples can be deleted.
- Open the order via Edit Order.
- Click the red Delete Order button on the right and confirm the confirmation prompt.
- To delete, you need access to the Delete Order action.
Further information: Access rights
Note: If the order has associated samples, the delete button is not displayed. In this case, first remove the assignment or archive the order.
Restoring a deleted order
Further information: Deleted Records