The report compiles the results into a print-ready test report (PDF) and enables:
You can create reports in different ways:
Note: The exact naming may vary depending on the configuration of your LDB. Some functions are always available, others depend on your permissions and configuration.

Figure: Creating a report via the sample detail view

Figure: Creating a report via the order detail view
Additionally, you can create reports directly in the sample list. To do this, select the desired samples, entire orders, or all listed samples.

Figure: Creating reports via the sample list
Once you have clicked Add Report, the screen for creating a report appears. The different areas of this screen are described below:
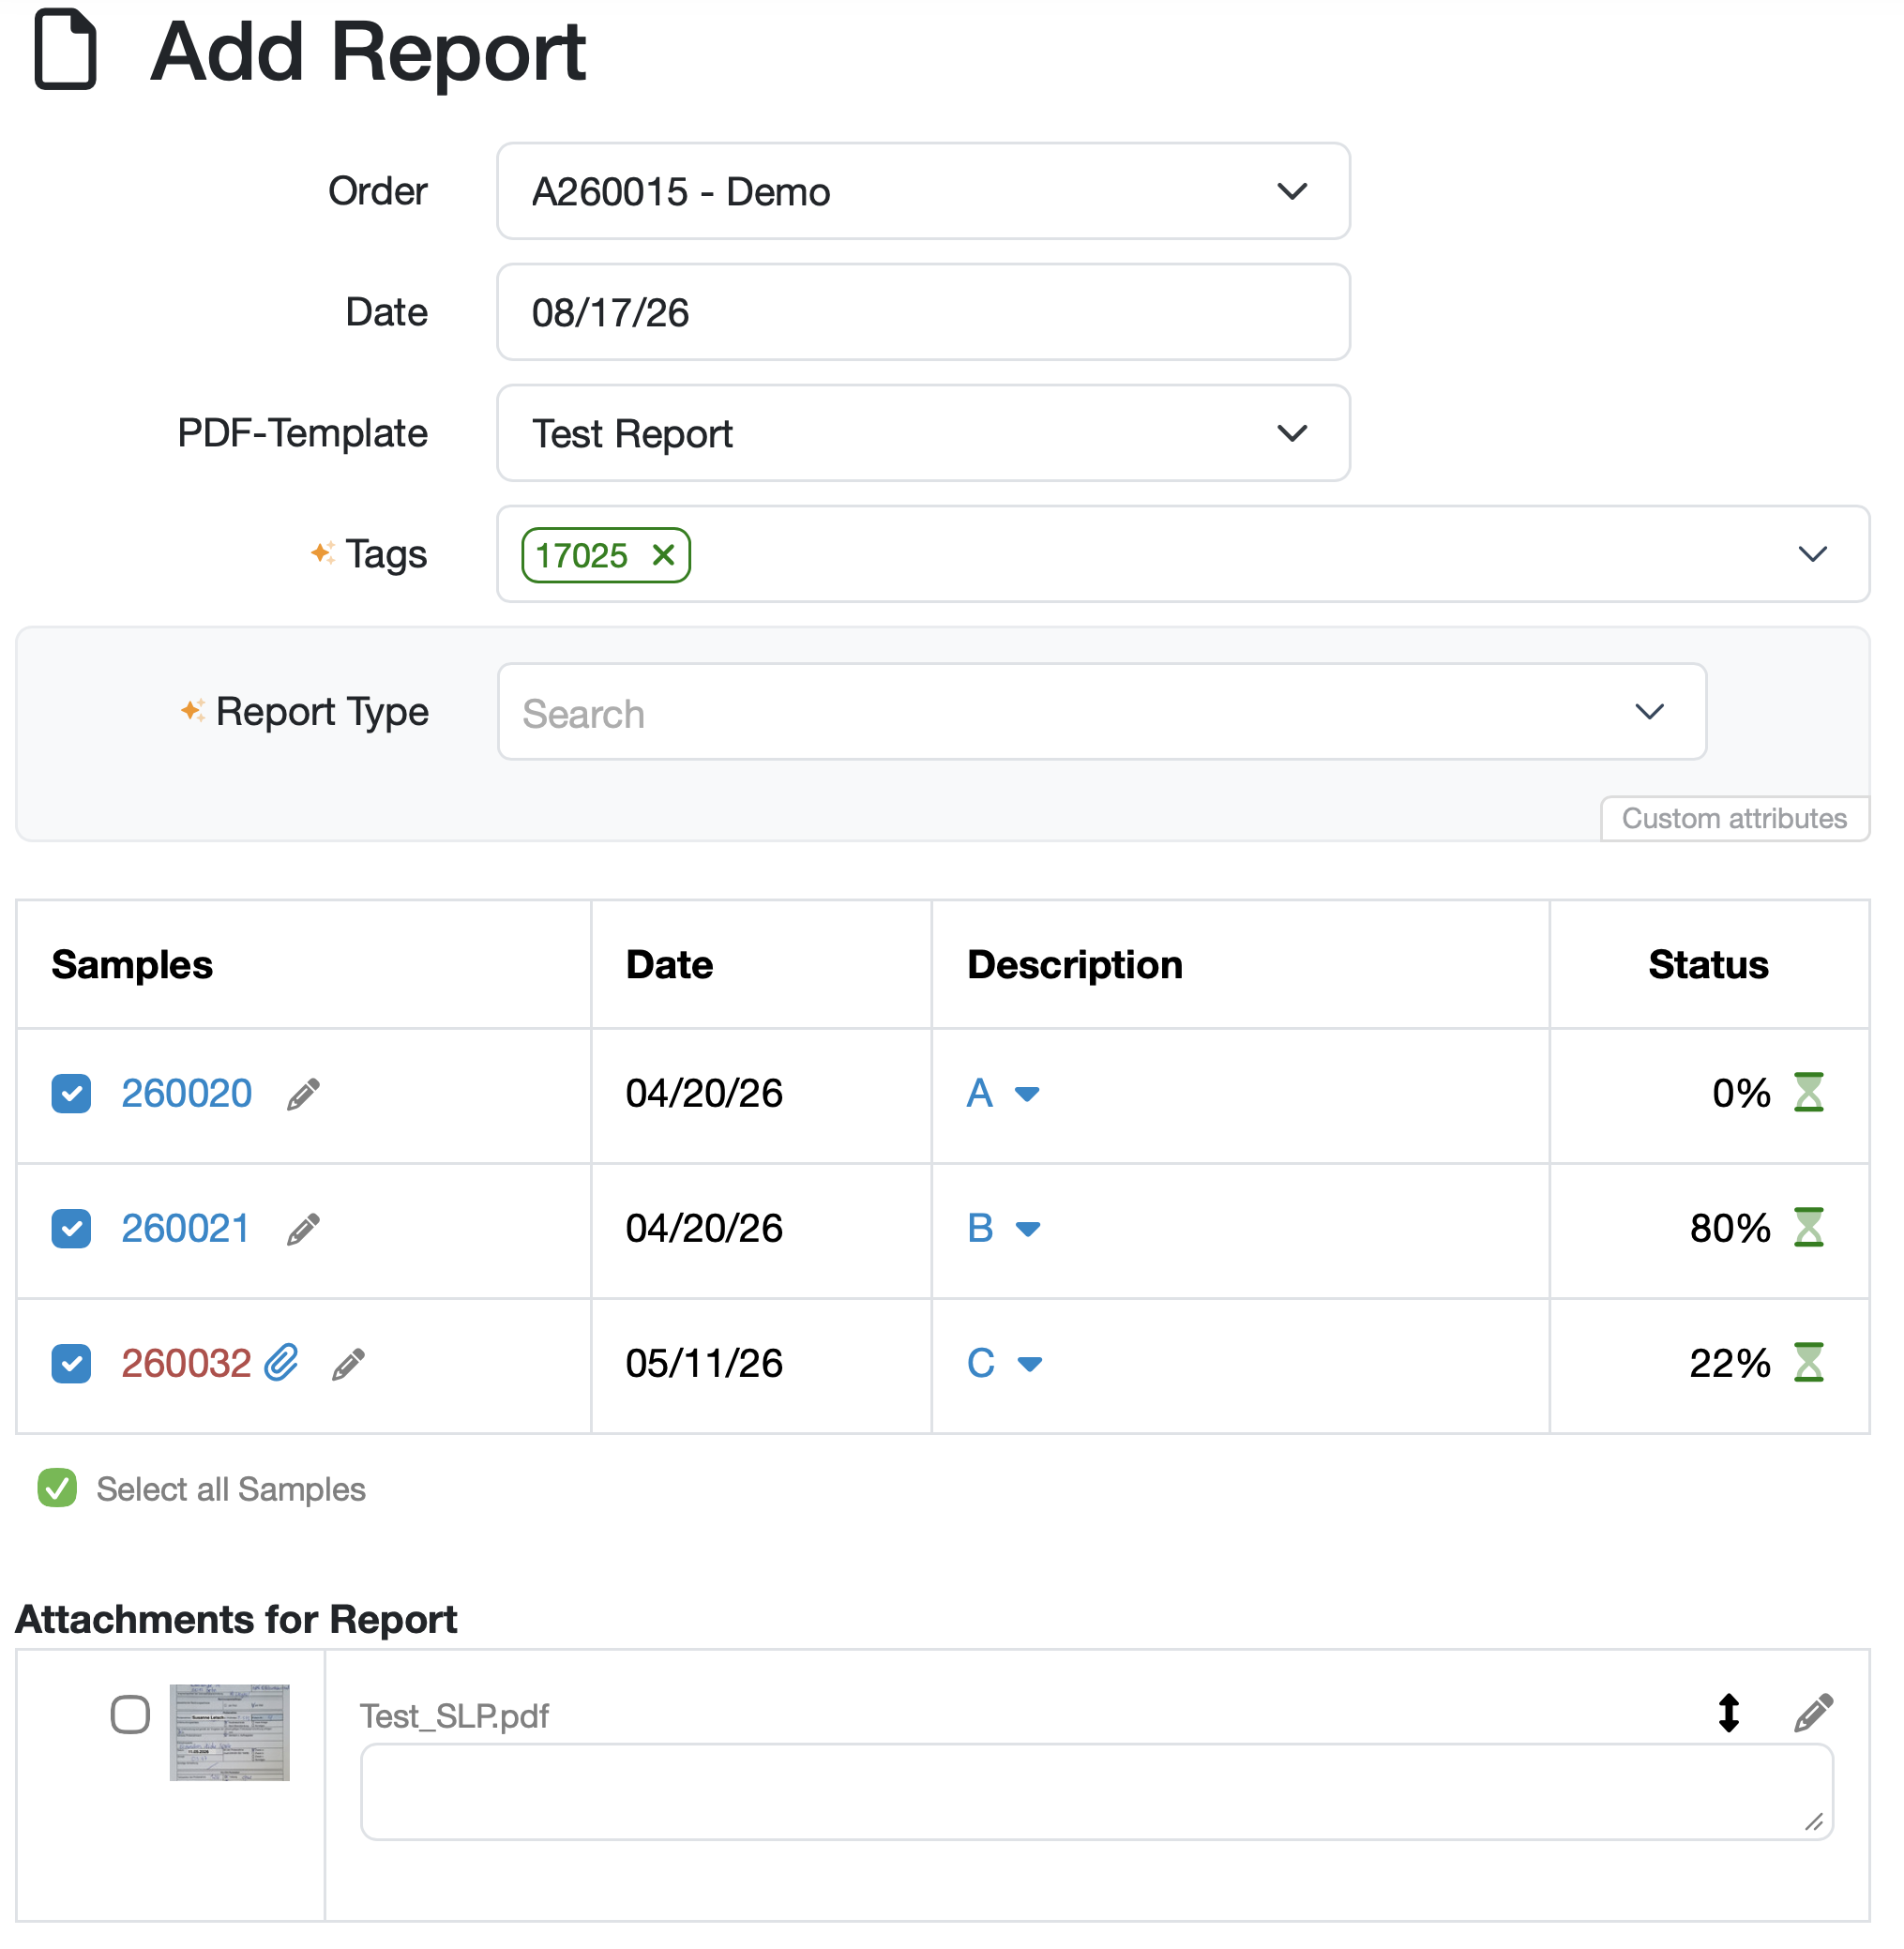
Figure: The „Add Report" screen
The header area contains fixed fields, pre-filled with data such as the order name, the report date, and the template.
Optionally, we can provide custom attributes. These are shown in the grey-shaded block below the header area — for example, the Report Type field shown in the figure, with a search field containing the options relevant to you.
Further information: Configurable attribute fields in the LABORDATENBANK
In the lower area, you select which samples are to be shown in the test report.
If you create a report starting from the order, you have the option of including all samples assigned to the order in the report.
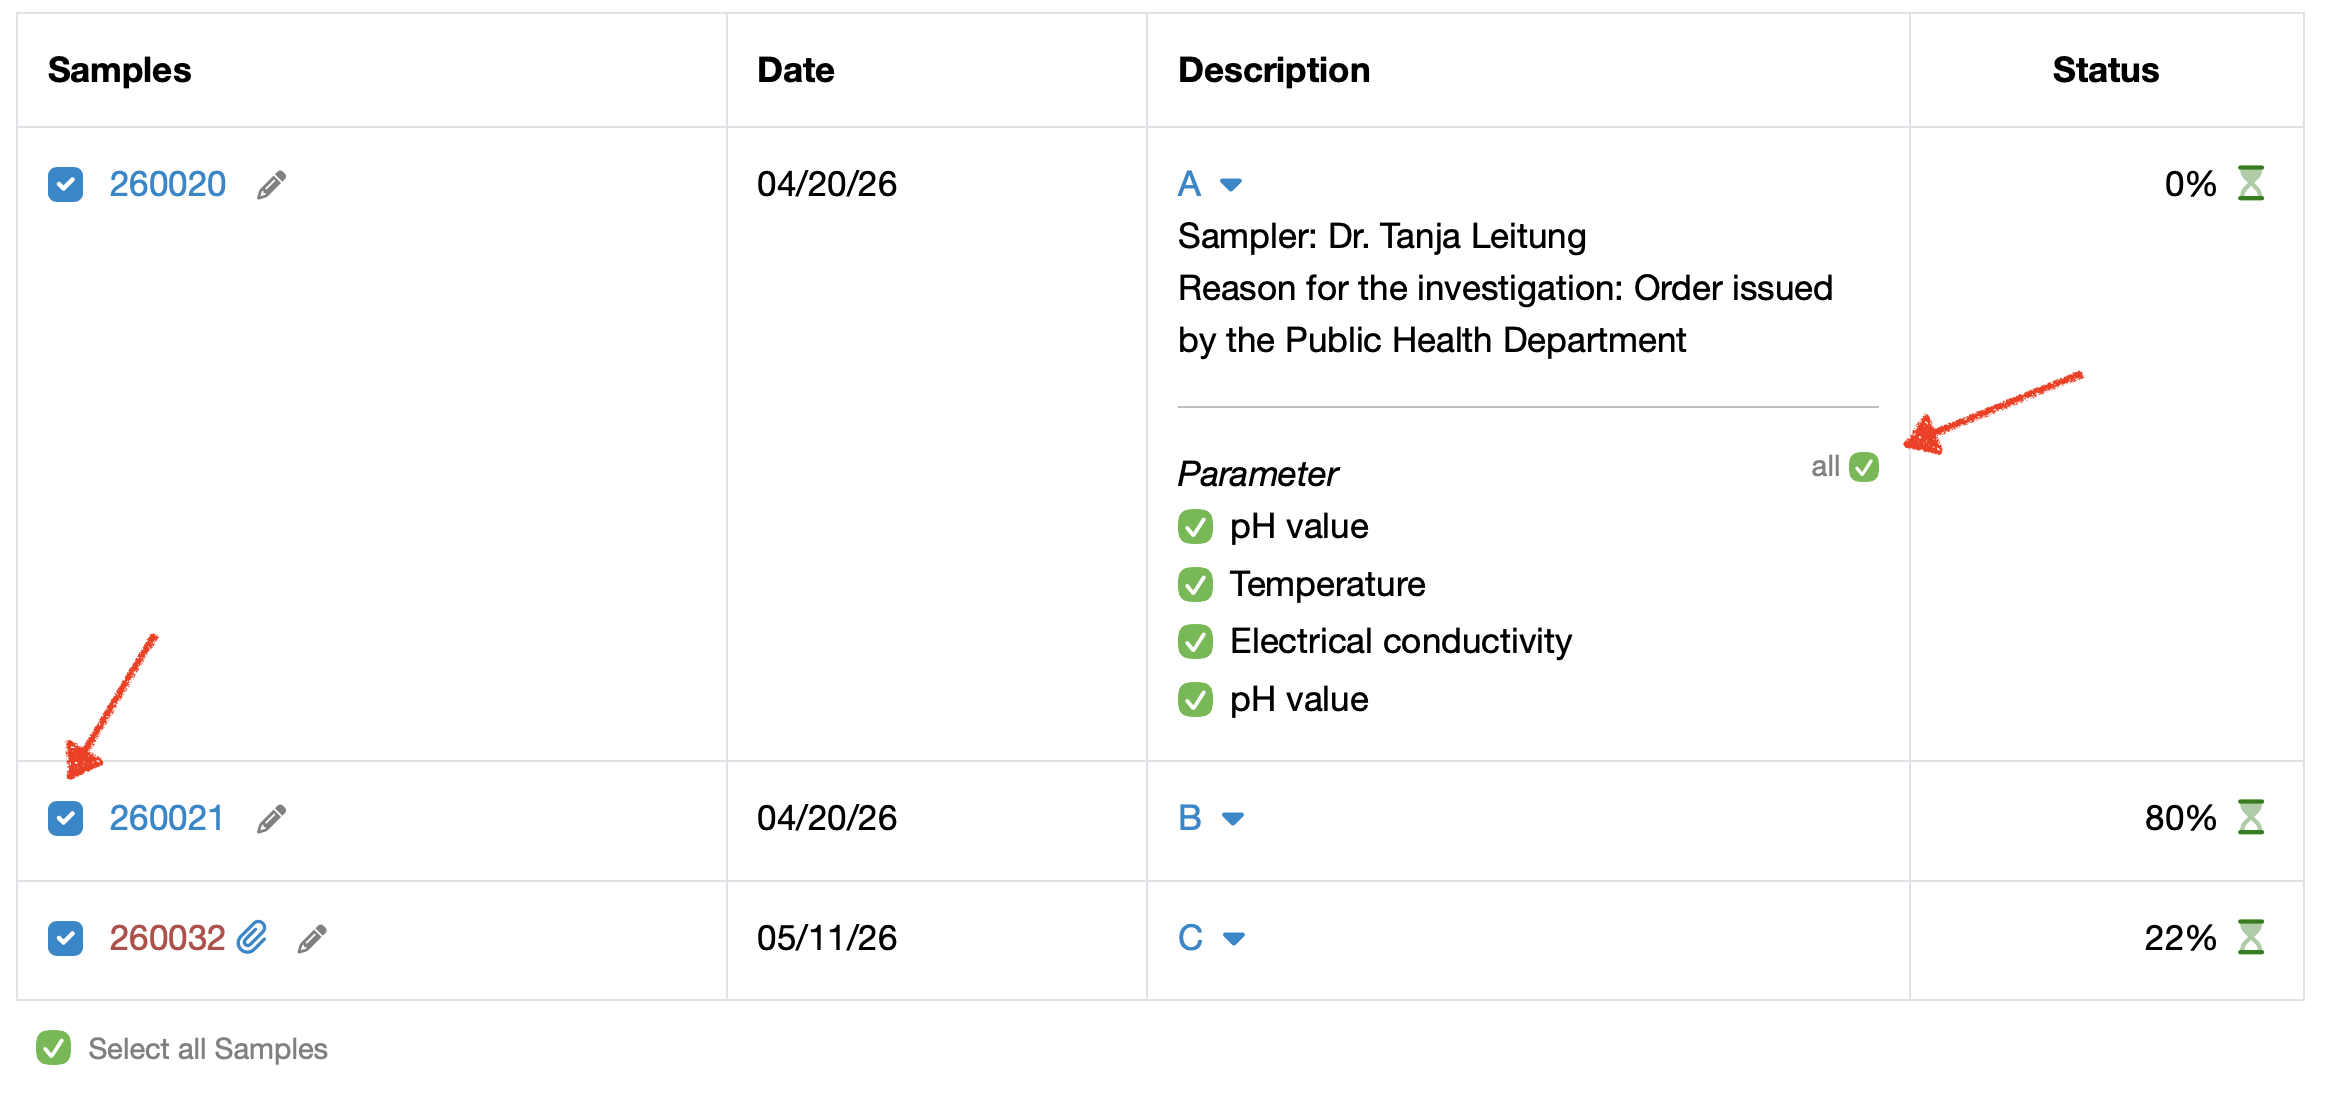
Figure: Sample and parameter selection when creating a report
The samples are shown in a tabular overview. The following table describes the columns.
| Column | Description |
|---|---|
| Samples | Shows the checkbox for including/excluding the sample as well as the blue sample number linking to the detail view. You can edit the sample via the pencil icon. |
| Date | Shows the date of the respective sample. |
| Description | Shows the blue description of the sample. Further options are available via the dropdown symbol to the right of the description. If present, filled-in master data fields are displayed. Under Parameters, you can also define which parameters of the sample are included in the report: activate or deactivate the individual parameters via the respective checkbox, or use All to select or deselect all parameters of the sample at once. |
| Status | Shows the current processing status of the sample as a percentage as well as a status icon. |
Files stored in the LDB can be inserted into the report as attachments.
Important:
Images are inserted into the test report according to the layout of your template. The following image formats are supported: .JPEG, .PNG, .GIF.
PDF files are inserted without formatting.
To insert one or more files into the report as an attachment, the files are stored (uploaded) with the associated order or with the associated samples.
Add files to the order
Add files to a sample
Once you have uploaded the files, you can select and attach them when creating or editing the test report.
Under Attachments for Report, you select which images or files from the order or the samples are shown in the appendix of the test report. The following options are available for each attachment:
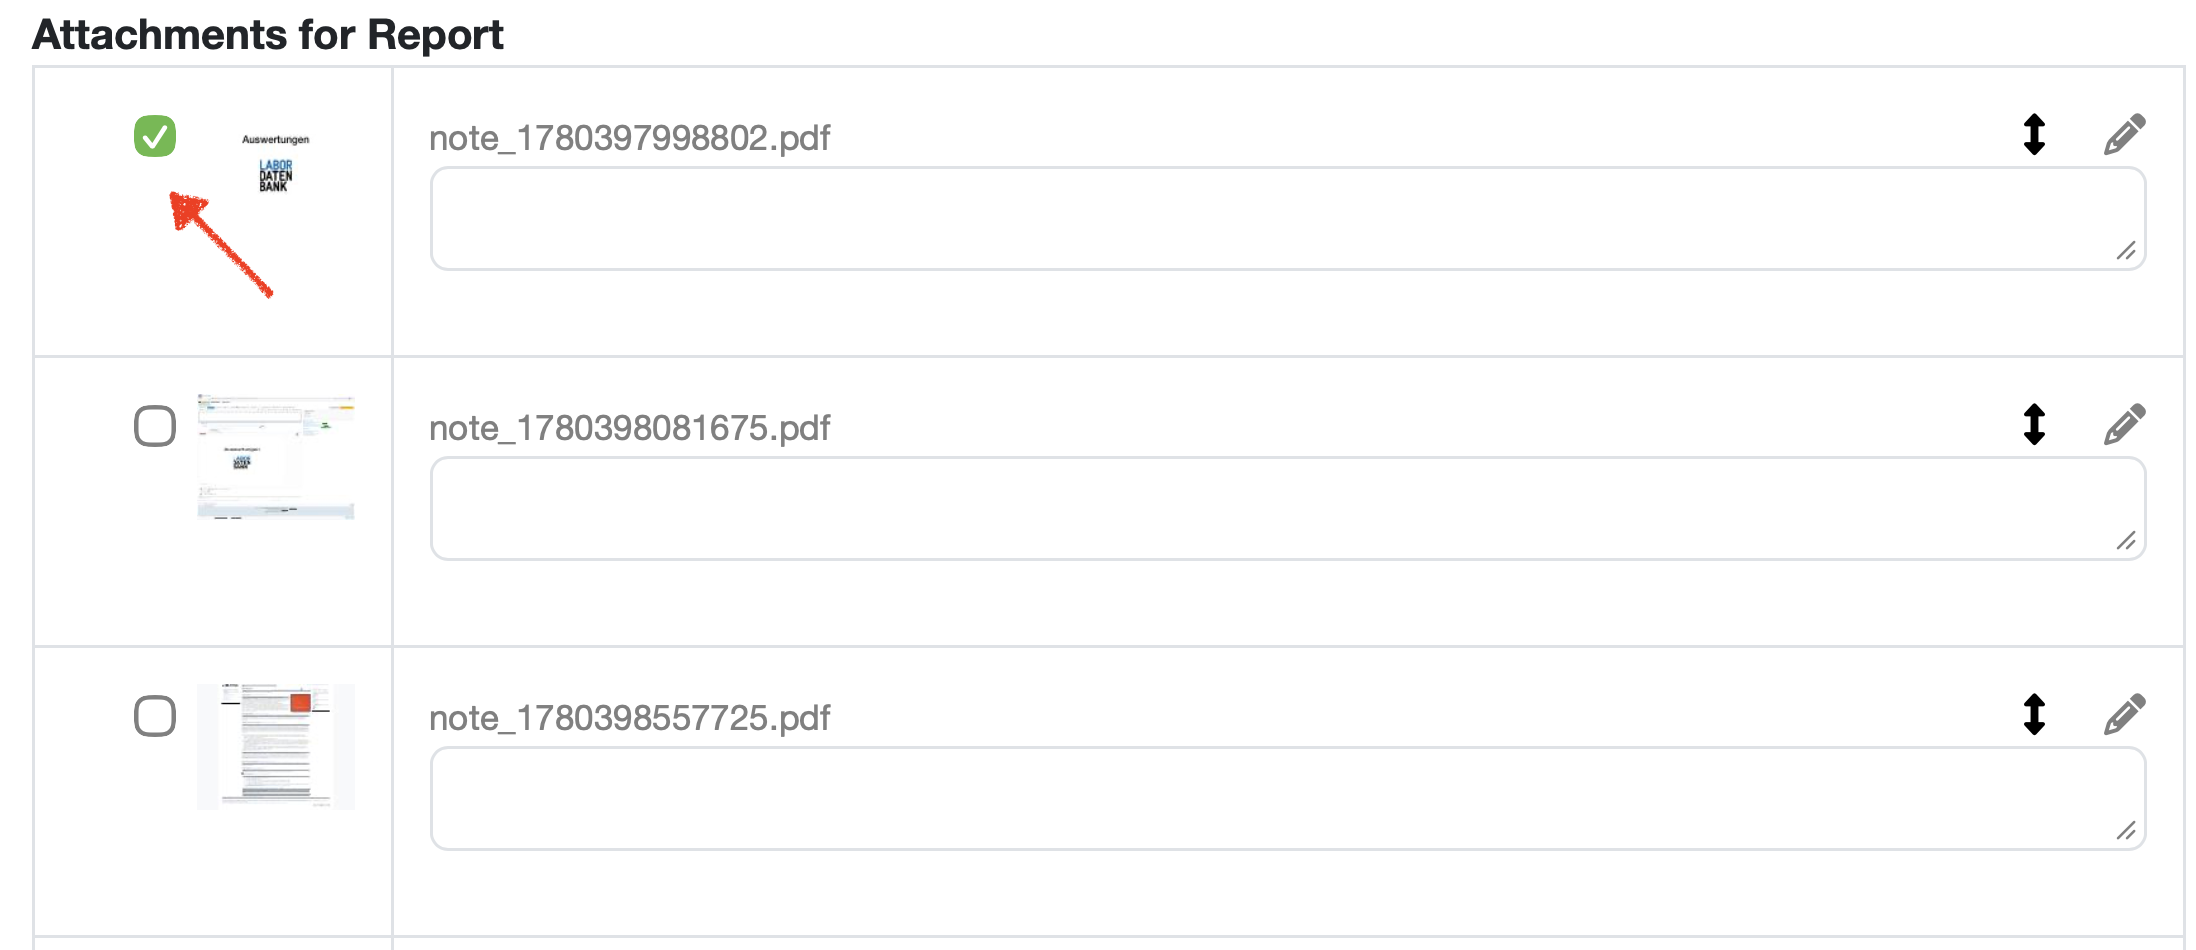
Figure: Selecting attachments for the report
Optional image reduction:
If the image size exceeds 200 KB, a checkbox is available to reduce the image.
When the checkbox is activated, the image width is reduced to 1200 px using imagecopyresampled, and a compression with a factor of 8 / 80 is applied using imagejpeg / imagepng.
Info:
In the report, images can also be added by creating a report table of the table type parameter tables.
Further information: Create/edit/delete a report table
You have the option to write an evaluation and a note on your test report.
Note: For text formatting, enclose the relevant text with one star for italic, two stars for bold, two underscores for underline, or two exponent signs to superscript text, e.g. m^^3^^ for m³.
The following options are available before saving:
Complete the process:
Note: Reports are saved in PDF/A-3b format. PDF/A documents are designed to be opened and read for decades without any loss of content or formatting.
The LDB assigns numbers to newly created reports according to a configurable pattern. This allows the numbering to be adapted to many requirements – from a simple sequential number to a format that contains the date, the assigned order, the PDF template used, or further information.
Note: The number format is configured centrally by your customer support during onboarding.
What options are available?
A report number can be composed of various building blocks:
Examples
Note: Information that is only added automatically after a report has been created (e.g. by evaluation triggers) is not yet available at the time the number is assigned and therefore cannot be part of the number.
As with creating a report, there are several ways to reach the editing screen in order to change the header data or the custom attributes.
If the order contains several samples, you can add further samples to the report while editing via the Show all samples of this order option (to the right below the sample table).
Note: As long as the report has not been signed, it can still be adjusted. Changes to the report or to the associated samples and measured values are then transferred into the PDF.
Reports are not permanently deleted but archived and thus removed from the overview. This keeps the data traceable.

Figure: Archiving a report
The behaviour of reports can be adjusted via numerous system settings. You reach the report-related settings via:
Navigation bar → Settings → System settings → Reports
With the appropriate permissions, you can adjust these settings via the system settings.
| Area | Setting | Description |
|---|---|---|
| Overview | Reports per page | Number of reports shown per page in the overview (20, 50, 100 or 200; default: 50). |
| Images and attachments | Attachment image width | Display size of image attachments: small (two images per row), medium (default) or full page width. |
| Show attachment file name | Determines whether the file name of an attachment is shown in the report (default: yes). | |
| Checkbox to reduce image attachments | Displays a checkbox when creating a report that lets you reduce large image attachments (default: no). | |
| Text fields and suggested texts | Header of the first text field | Label of the first text field (default: „Note"; translatable). |
| First text field fixed in the report | Determines whether the first text field is displayed permanently in the report (default: yes). | |
| Header of the second text field | Label of the second text field (default: „Assessment"; translatable). | |
| Use second text field | Activates a second text field in the report (default: no). | |
| Header of the third text field | Label of the third text field (translatable). | |
| Use third text field | Activates a third text field in the report (default: no). | |
| Re-issue | Reason for re-issue required | Determines whether a reason must be entered when re-issuing a report (default: no). |
| Signing | Creator may sign | Determines whether the creator of a report may sign it themselves (default: yes). |
| Show signature at the end of the report | Shows or hides the signature at the end of the report (default: show). Hiding it is useful, for example, when the signature is inserted as a design element. | |
| Time of signature selection | Determines whether the signature is saved when signing (default) or already selected when the report is created. | |
| New date when signing | Controls whether a new report date can be set when signing: not activated (default), can be activated via checkbox, or always the date of signing. | |
| Sending | Only send signed reports | Prevents the sending of unsigned reports (default: no). |
| Sender address | Email address from which reports are sent. | |
| Recipient address | Default recipient of the report (default: the customer's email address). | |
| CC address / BCC address | Additional recipients in copy or blind copy. | |
| Subject of the sending email | Subject line of the sending email (translatable). | |
| Body of the sending email | Message text of the sending email (translatable). | |
| SMS notification text | Text of the SMS notification with a link to the report. | |
| Preselect report as email attachment | Automatically preselects the report as an attachment when sending (default: yes). | |
| Send to multiple email addresses | Enables sending to several recipients at once (default: no). |
The following settings are configurable by your customer support. Please contact your support if you would like to adjust any of these settings.
| Area | Setting | Description |
|---|---|---|
| Signing | Warning before signing | Stored check that can trigger a warning before signing (e.g. for certain sample states). |
| Sorting of the report overview | Order in which reports are shown in the overview (default: newest first). | |
| Order of samples in the report | Sorting of the samples within a report (default: ascending by sample number). | |
| Separate report per sample | Enables creating a separate report for each selected sample (default: no). | |
| "Separate report" checkbox preselected | Determines whether the corresponding checkbox is preselected when creating a report (default: no). | |
| Suggested text per sample | Displays a separate suggested text for each sample (default: no). | |
| Set sample status on creation | Defines which status is assigned to the samples when a report is created. | |
| Set sample status on signing | Defines which status is assigned to the samples when signing. | |
| Preselection of attachments | Determines which attachments are preselected when creating a report: none (default), all attachments from samples and orders (except parameter attachments), or only JPG attachments from samples. | |
| Design and layout | Header behind other elements | Controls the layer of the header area in the layout (default: yes). |
| Show footer above attached PDF | Shows the footer above an attached PDF (default: no). | |
| Selection of PDF templates | Stored query that determines which PDF templates are available for selection. | |
| Sending (administration) | Automatically send report after signing | Sends a report automatically by email after signing. |
| Email variables | Stored query that provides variables for the sending emails. |
Numbering and Naming of the data type „Report" (e.g. Test Report, Certificate of Analysis, Report of Analysis ...) in your LDB:
Configured during onboarding.
Related topics:
Last change: 10/14/26
General information
8D-report
Supplier evaluation
Material
Employees
Customers
Orders
Samples
PDF templates
Assets
Recipes
Reports
Report table editor
Interfaces
AI functions
Introductory phase
Query reports
Templates
Client zone (optional)
Offers
Invoices
Parameters
Calculating with parameters
Webservices
Transformationscode
Test plans / limit values / specifications
Documents control
Questions and answers
Equipment
Trainings
Others
File management
Processes